
Raise your hand, if you know about A/B Testing.
You do. Good.
It is very simple, just design two versions (A and B) of a specific web page, split the traffic between them, choose the one that provides you the maximum conversion. Isn’t it?
Yes, you are right this is A/B Testing.
Next question. Have you ever tried to do A/B testing yourself on your website?
No?
I see these might be the following reasons you’re probably not A/B testing your website:
- It’s kind of expensive for you
- You don’t have experience of AB Testing
- You don’t have right conversion testing tool
- You don’t need A/B testing
I can assure you after finish reading this post, the above-mentioned reasons won’t exist anymore for you.
Before we start ahead, I would like to see the following A/B testing statistics to inspire your own tests:
- Google ran more than seven thousand A/B tests in 2011. 40 of them were to test which shades of blue earned more clicks.
- QuickSprout runs one A/B test every two weeks. A quarter of all their tests boosts the relevant conversion rate by at least 20%.
- After removing ‘Revenue’ label from the entry form, Neil Patel boosted his site’s conversion rate by 26%.
- Data protection company Veeam Software changed its CTA ‘Request a Quote’ to ‘Request Pricing’ its increased their CTR by 161%.
Now you know A/B Testing is really worth all the trouble.
In today’s post, I will show you a step-by-step guide how to do A/B testing with Google Analytics in less than 10 minutes.
Let’s get started:
Before you start AB tests
This is one of the first steps of A/B testing. You must have a clear conversion goal before you start testing.
If you aren’t sure about it conversion goal, see below:
You might have one or more of the following conversion goals:
- You want users to make a purchase
- You want users to sign up for a newsletter
- You want to increase revenue
- You want to keep users stay longer on your website
- You want to lower the bounce rate of your website
It becomes easy for you to take a step further if you are clear about your decision regarding split testing.
I would recommend you only pick one important goal for each test. It will keep you focused on the metric you want to improve.
Once you choose your goal, you need to setup it in Google Analytics.
Before you use split testing through GA, you must have a Google account if you don’t have one, create an Analytics account, and put the Analytics tracking code to your every web page that you want to test.
Once you’ve set up your Analytics account, you are eligible to use GA for A/B testing.
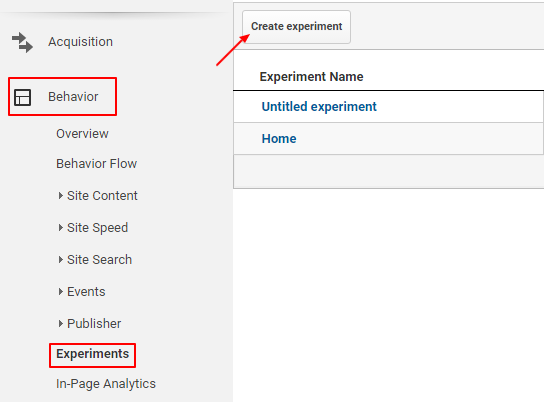
Step One – Define your objective you want to test
Google has merged A/B testing and split testing into one term content experiment.
You’ll find it under Google Analytics: Reporting>>Behavior>>Experiments.
It will represent you this page, simply clicks the button for “Create Experiment.”
First, you have to add the experiment name. You should keep a descriptive name that makes it easy for you to identify the experiment.
Under the “Objective for this experiment” choose a metric that you want to test. Metrics can be chosen from Adsense, E-commerce, Goals, Site Usage, etc.
- If you’re willing to enhance CTR for ad clicks or impressions, then select the Adsense option
- If you want to increase revenue or the number of transactions, choose eCommerce
- If you have a predefined goal, opt for the goal metric
- At the end, if you want to provide better user experience through average page views or time on site, go for site usage.
You are free to choose more than one metrics at the same time.
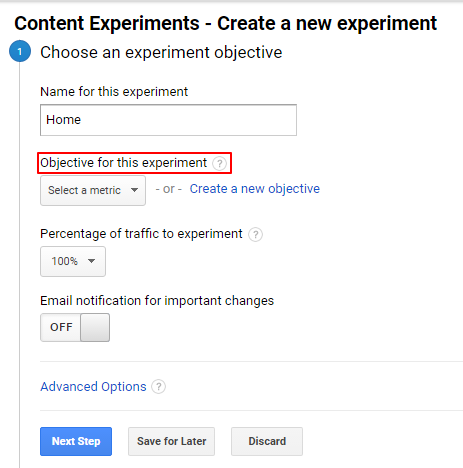
Under Percentage of traffic to experiment, select the percentage of traffic you want to distribute.
Set the “Email notification for important changes” on, if you would like to get an email notification about the progress or if any changes happen to your content experiments.
In the advanced setting section, you can decide if you want to send an equal amount of traffic to both variations using “Distribute Traffic” button on.
If you don’t on this button, content experiments will follow the default behavior by adjusting traffic dynamically based on variation performance.
You can also set the minimum time you want to run the experiments.
For better result run the experiment at least three weeks.
Step Two – Identify the original and variation pages
In this step, you have to set up both your URLs (Original and Variant) for experiments.
In the Original Page field, enter the URL of the page you want to test (for instance, your website’s home page, or particular landing page for a product), then press Enter, if the URL will be live you will see a snapshot at the right side.
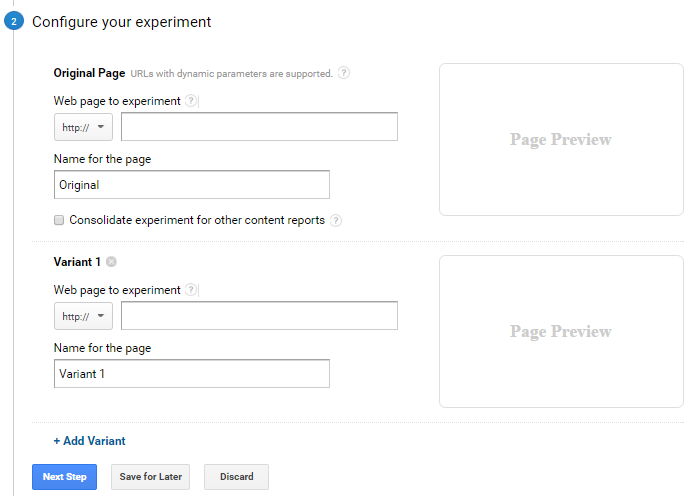
In the name, field writes a descriptive name so that it’s easy to know your experiment report.
In the variant one field, enter the URL that you want to test against the original and click on the “Next Step” button.
Remember, you can’t use different hostnames/domains when you’re creating variations. For example: If your original page is http://abc.com/original then your variation pages must also be part of the http://abc.com/original e.g. (http://abc.com/original_test1, http://abc.com/original_test2, etc.)
Step 3- Implement and test experiment code
You will be redirected to this page where you will find your experiment code.
If you have properly installed GA code on your original and variation pages, an experimental code will be immediately visible in the box.
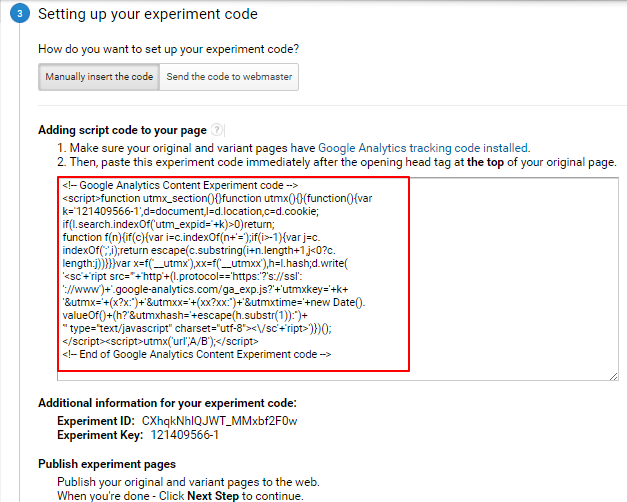
Put this code just after the opening head tag at the top of your main web page. Once it’s added, click on the “Save Changes” button again to move to the final step.
Step 4 – Validate your experiment code
Once you have added the experiment code on your original page, click Next Step to verify the code.
By doing so content experiments check if the code has properly installed on each page or not, as well as verify that each page contains the Analytics tracking code.
If you see the message “No experiment code found” don’t get panic, it happens sometimes Analytics don’t find the code. You can skip this phase if you are sure you have put the code on each page.
You will see a green check mark for the pages which coded correctly.
Step 5. Review and start your experiment
If experiments have successfully verified your experiment code as well as the tracking code on your both testing pages, you are ready to start your experiment, hit the Start Experiment button.
If you don’t want to start experimenting right now; you can do it later by click Save for Later.
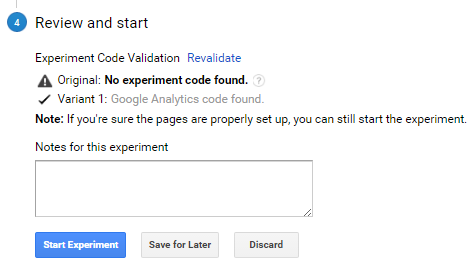
After completion of your experiments date, Google analytics will show the conversion results for both pages.
So, you can review them and choose the best performing page to show your visitors.
Easy? Isn’t it?
Google analytics is a free tool and very handy. You don’t need any special skills to run A/B testing.
You can do it in few simple steps without any help. All you’ll need is a Google analytics account and the pages you want to test.
Share me your experience with your content experiments with Google analytics. What outcome did you get from that?
Thanks for sharing this post on A/B Testing with Google Analytics. Honestly, I have never tried A/B testing on any the sites I have worked in the past. I didn’t feel the need for the same. Now, I realize my mistake. A/B Testing can make a huge difference. Will surely give it a try!!
Aswani recently posted…Top Latest Digital Marketing Interview Questions 2017
Hi Shubhanshi Aggarwal,
Thanx for sharing this wonderful information and I loved the way you have written.
Software development companies dedicate a substantial amount of resources and manpower for the development of applications according to requirements specified by enterprises or individuals. These features will help them increase their business and earn profits.
Alisha Henderson recently posted…Achieving Agility and Scalability Becomes Reality with Microservices Architecture
Great share!
I found it worth discussing. I have observed that companies ignore hiring testers and allocate the testing assignments to the developers itself which seems like they do not understand the importance of actual QA and testing.